If you’re uptight about uptime, if you’re anxious about availability, if you nervously watching Nagios, have I got the program for you. Forget 12 step programs, mine has 13!
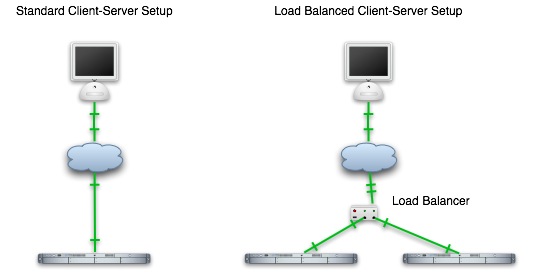
First let’s talk load balancing. Load balancing is basically distributing some type of load across multiple servers or resources. For the sake of simplicity, we’ll assume that it’s web requests to web servers that we’re talking about, but it’s all equally applicable to databases, mail servers, or just about any other network accessed computing resource (assuming you can handle the back-end synchronization if required, such as with a database).
There are two primary reasons to load balance:
- Capacity: one server may not have enough power or resources to handle all of the requests, so you need to break the load out across multiple servers.
- Redundancy: relying on a single server means that if it fails, everything is down. A single point of failure can bring down your critical application. Servers fail; both hardware and software. A blown power supply, bad RAM, a dead NIC, eventually something will go out. No software is 100% bulletproof either. If you have two or more servers handling the load, then even if one fails, the other(s) can take over without your application or users seeing any difficulties.
A load balancer sits between your users (human or machine) and your servers. It typically passes requests through to multiple servers and returns the responses to the end user, acting like a transparent proxy. It can distribute load in many different ways, randomly, round-robin, or in more complex ways. It usually monitors the servers so that if a server dies it is removed from the pool and no user requests are sent there.
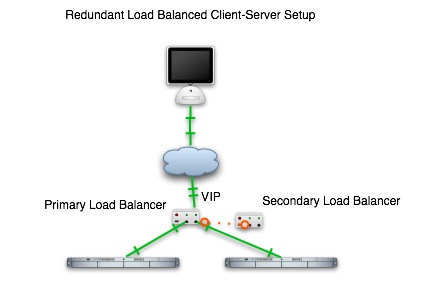
This satisfies the capacity problem above, and helps with the redundancy issue, as in general load balancers are more reliable than the servers they distribute load to. But really what we need is more than one load balancer, in case one fails. Since in general an address points to an IP (more about DNS based round robin load balancing in a later post), you usually have a primary load balancer which is listening at a virtual IP address, or VIP, and a secondary load balancer, that monitors the primary one, and takes over the VIP if the primary load balancer fails. That setup looks like this:
Load balancers can be everything from expensive dedicated hardware from vendors like F5 to software running on any type of computer you have. In this posting we’re going to setup a redundant load balancing solution using commodity servers running Debian Linux. The servers have two NICs, one is world facing, and one faces a private network. You should be able to make all of this work with single NICs however.
There’s two pieces to this puzzle: one is the load balancing software, and one is the redundancy part. We’ll start with the load balancing solution.
There are tons of options out there for providing load balancing on Linux. I’ve picked HAProxy for this for a few reasons. One of which is I didn’t want an interpreted load balancer so I ruled out perlbal and others like it. I also didn’t want to use Apache’s load balancing and proxying options as it’s a little heavy for this purpose in my opinion, and I wanted the option to handle non-web requests if I want to. HAProxy seems to be pretty mature, pretty well optimized, has a ton of features and power I haven’t touched yet, and is well supported on Linux systems.
There are seven steps to getting HAProxy setup the way we want. Do these on both of your load balancer servers.
1. Download the source for the latest recommended version from here: http://haproxy.1wt.eu Currently that is 1.3.14.
wget http://haproxy.1wt.eu/download/1.3/src/haproxy-1.3.14.tar.gz
gunzip haproxy-1.3.14.tar.gz
tar -xvf haproxy-1.3.14.tar
cd haproxy-1.3.14
2. Build the binary using the following command:
make TARGET=linux26 CPU=i686
3. Install the binary into /usr/sbin.
cp haproxy /usr/sbin/haproxy
chmod +x /usr/sbin/haproxy
4. Create a configuration file at /etc/haproxy.cfg
emacs /etc/haproxy.cfg
paste in contents from this sample file haproxy.cfg
edit the cluster name and VIP on line 26
edit the servers in the cluster on lines 36 and beyond. The syntax is:
server $serverNickname $serverHostname:$port check
5. Create a control script at /etc/init.d/haproxy
emacs /etc/init.d/haproxy
paste in the contents from this file haproxy control script
chmod +x /etc/init.d/haproxy
6. Create a new user haproxy
adduser haproxy
7. Start haproxy
/etc/init.d/haproxy start
Now you have a working proxy that listens on the VIP you’ve specified and proxies requests out in a round-robin fashion to all of the servers you have listed. Right now though, it won’t work. Because you haven’t bound your VIP to either server. Right? Good. Now we move on to the redundancy part. This will automatically bind the VIP first to the primary load balancer, and then to the secondary load balancer if the primary fails. If the primary comes back up, it will flip back.
I’ve picked Heartbeat 2 as the failover mechanism. There are others.
This is a simple 6 step setup:
1. Install heartbeat 2 from apt-get
apt-get install heartbeat-2
2. Allow the server to bind the shared VIP
emacs /etc/sysctl.conf
paste in the following line at the end of the file
net.ipv4.ip_nonlocal_bind=1
sysctl -p
3. Create an auth key file at /etc/ha.d/authkeys
emacs /etc/ha.d/authkeys
paste in this:
auth 3

3 md5 $randomString
replacing the $randomString with a random string of your own
chmod 600 /etc/ha.d/authkeys
4. Create a configuration file at /etc/ha.d/ha.cf
emacs /etc/ha.d/ha.cf
paste in the contents from this file heartbeat config file
edit the heartbeat address on line 15 to be the private IP of the other load balancer. For example lb1 would have the private IP of lb2 there, and lb2 would have the private IP of lb1.
This is the only line that is different between the load balancers.
5. Create an haresources file at /etc/ha.d/haresources
emacs /etc/ha.d/haresources
paste in this:
$primaryLoadBalancerNodeName $VIP/$subnetType/eth1/$VIPBroadcastAddress
where $primaryLoadBalancerNodeName is the output of `uname -n` on your primary load balancer, $VIP is the Virtual IP address you will be addressing requests to, $subnetType is the numeric subnet type, and $VIPBroadcastAddress is the broadcast address for the Virtual IP. For example:
lb1.mydomain.com 63.228.49.194/29/eth0/63.228.49.199
6. Start heartbeat
/etc/init.d/heartbeat start
And that is it. At this point you should have a redundant load balancer solution sitting in front of your cluster of servers. Feel free to read the documentation on HAProxy and Heartbeat 2 to learn about all of the amazing things they can do. For instance you can drive requests out to different sets of servers based on the requested URI, you can handle session stickiness in many ways, you can have the heartbeat monitor things other than the other heartbeat instance like ping or http or others. There’s tons that can be done. This is just a simple way to get an enterprise worthy load balancing solution for the cost of two servers. You can probably even run this right on your web servers without too much penalty.
Enjoy!


Leave a Reply